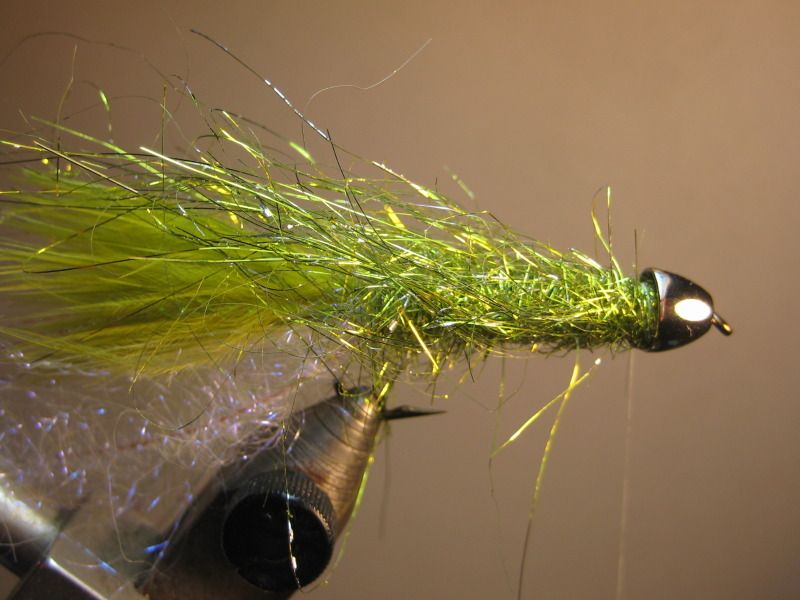
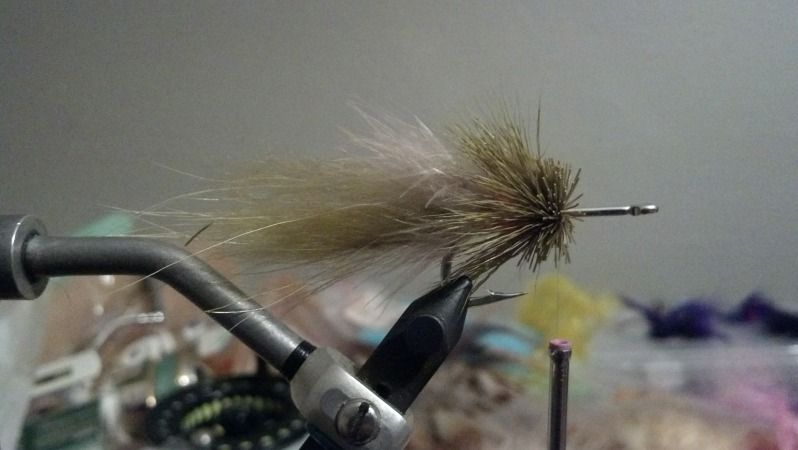
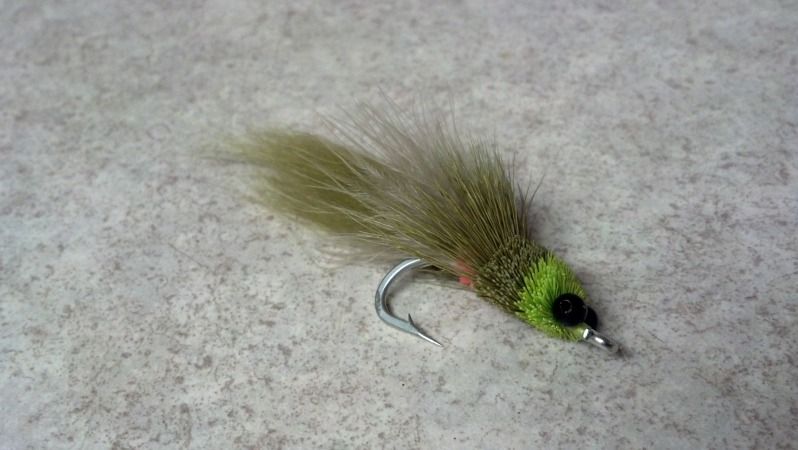
Here is a pattern I love to tie for smallmouth. This step-by-step instruction is not mine.....Coffee did a great job, so why reinvent the wheel. Thank you Coffee for the great work!
"Pretty simple fly to tie; making the dubbing brushes (not shown; you folks know how to make them better than I do) took about as long as the rest of the fly."
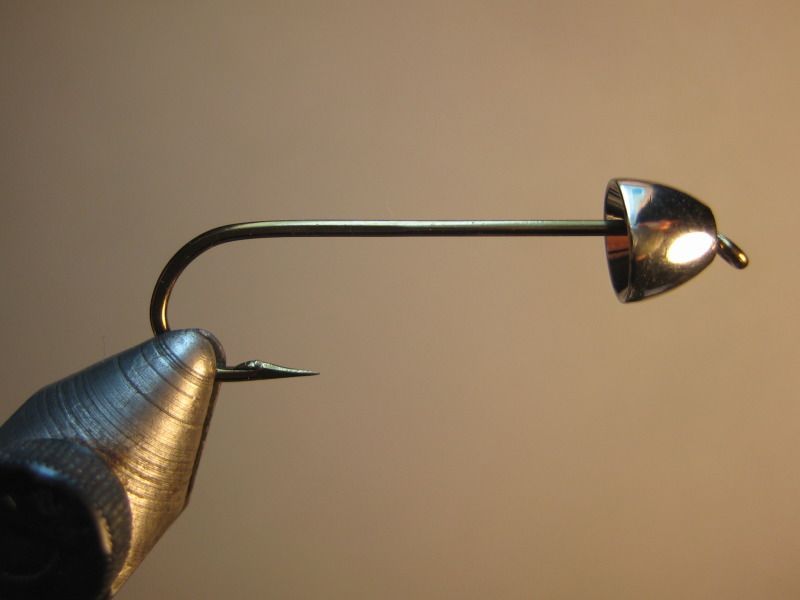
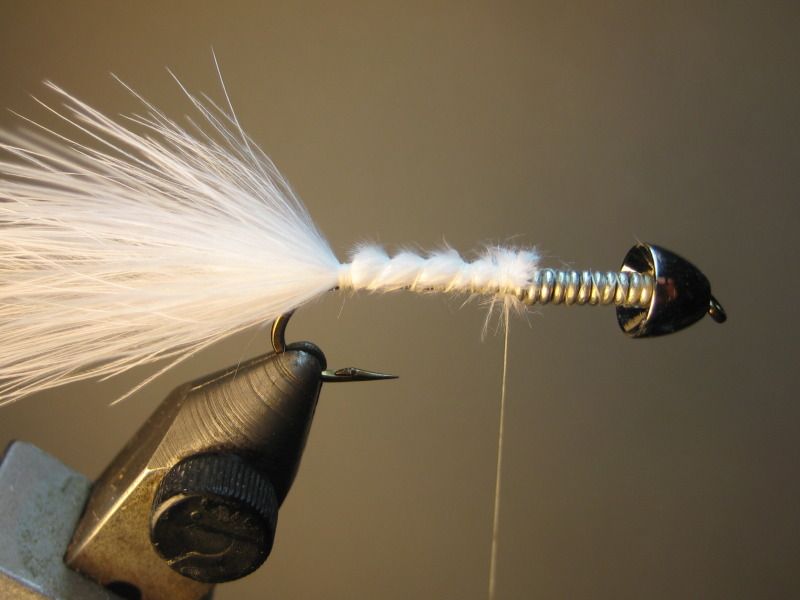
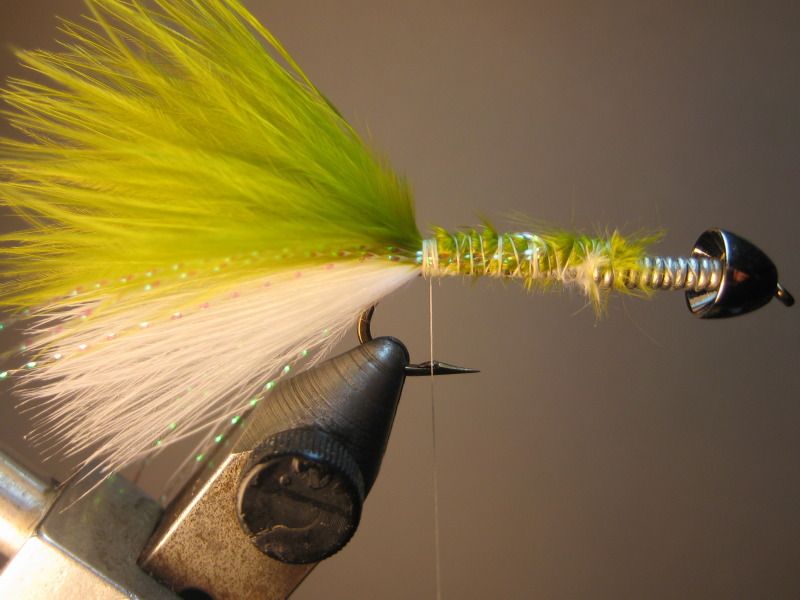
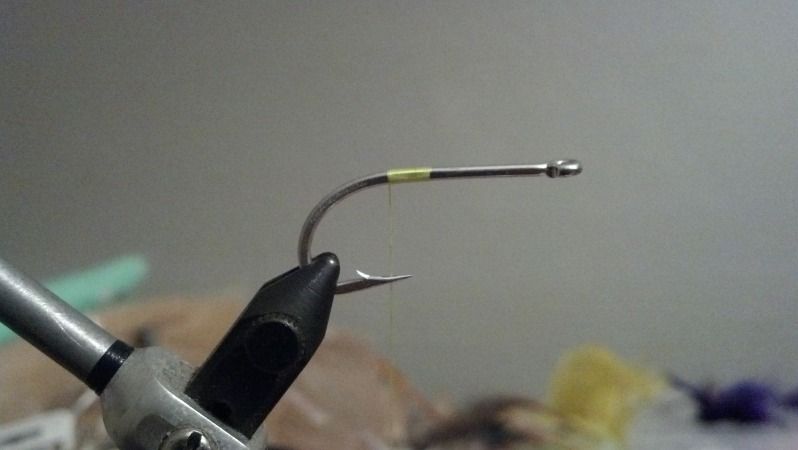
hook - Mustad 79580 #6
thread - Uni 8/0 white
weight - lead free wire .030 tail - marabou white/olive flash - Krystal Flash pearl
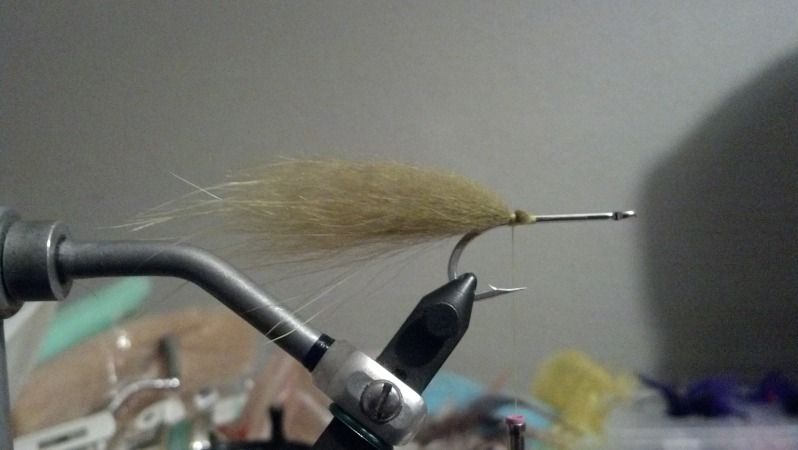
body - dubbing brush EP Flash chartreuse
belly - dubbing brush Ice Dub pearl
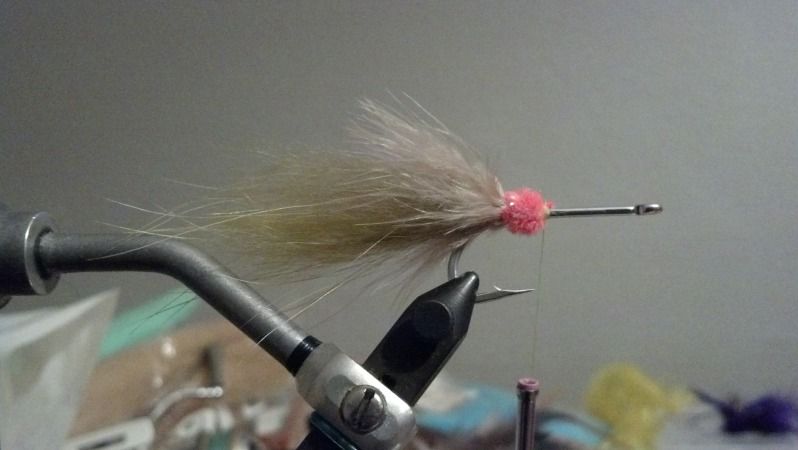
head - 1/4" cone silver
mash barb and slide cone on hook
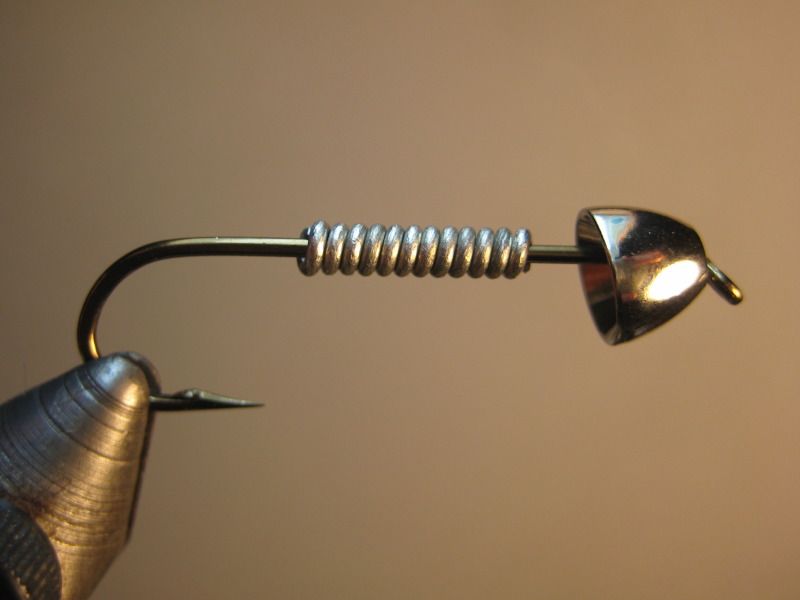
wrap some lead free wire on hook
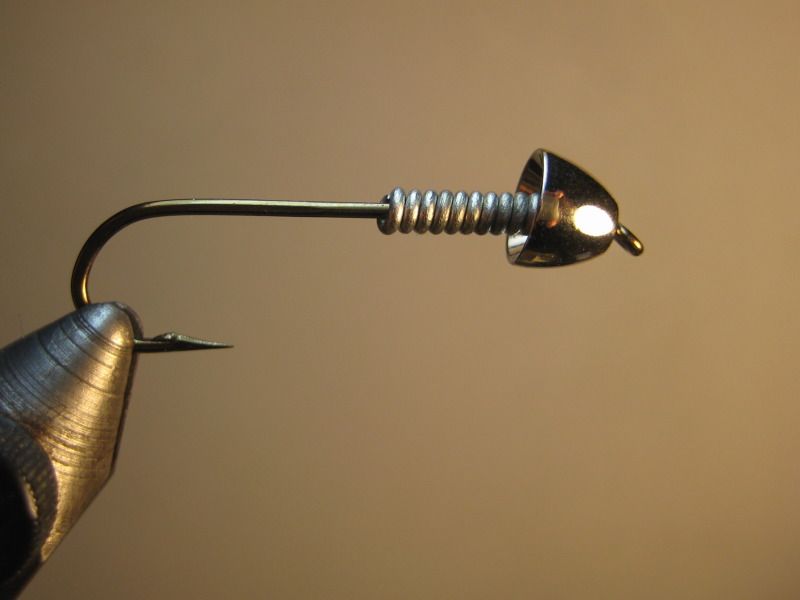
push the wire forward into the cone, locking it against the eye
attach thread, wrap the lead and move it back to point above the hook barb
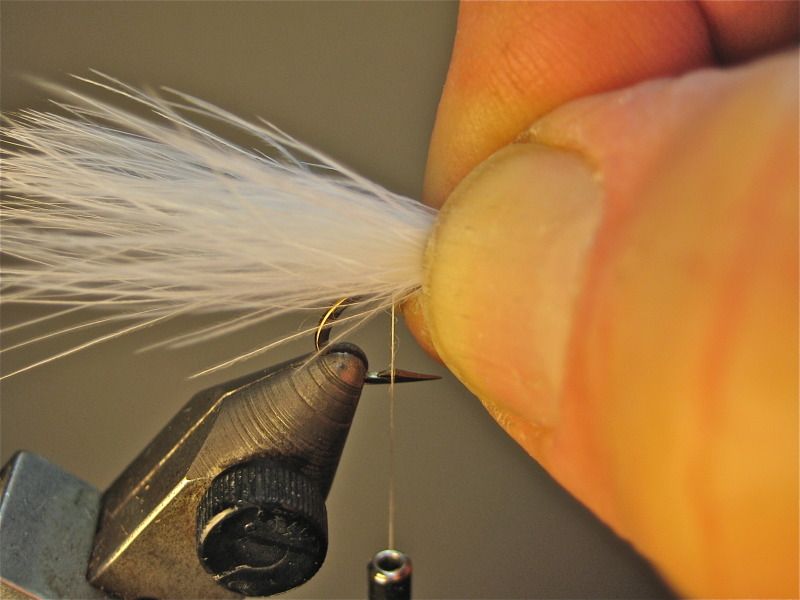
measure marabou (shank length)
tie in and wrap forward to lead
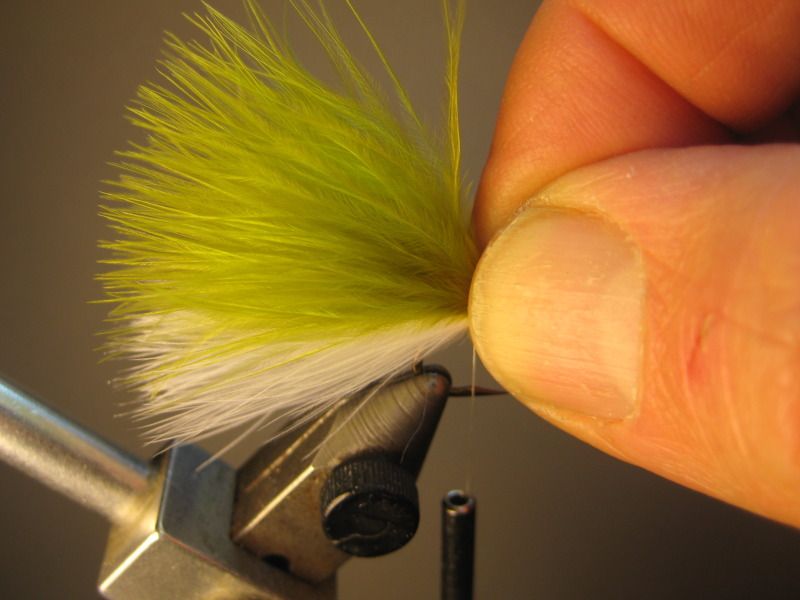
repeat with olive marabou
tie in Krystal Flash on near side
fold tag ends over to far side and wrap back to tail
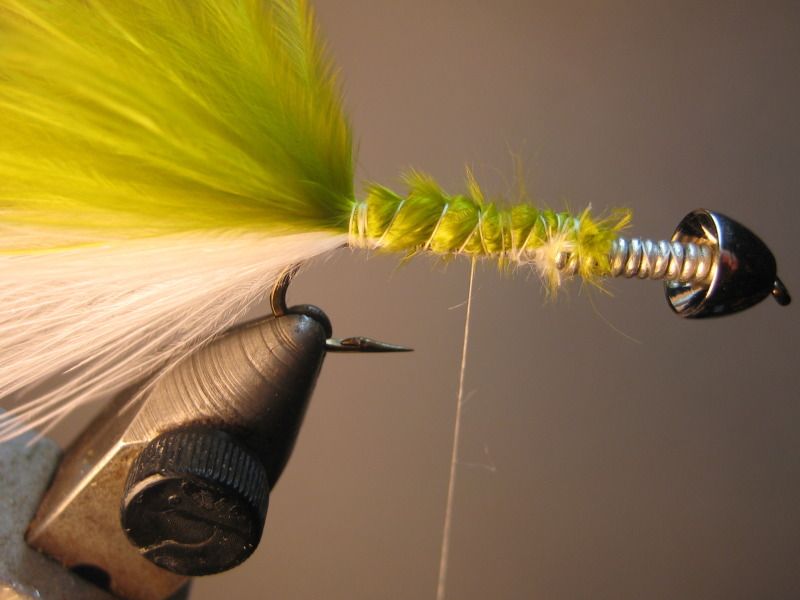
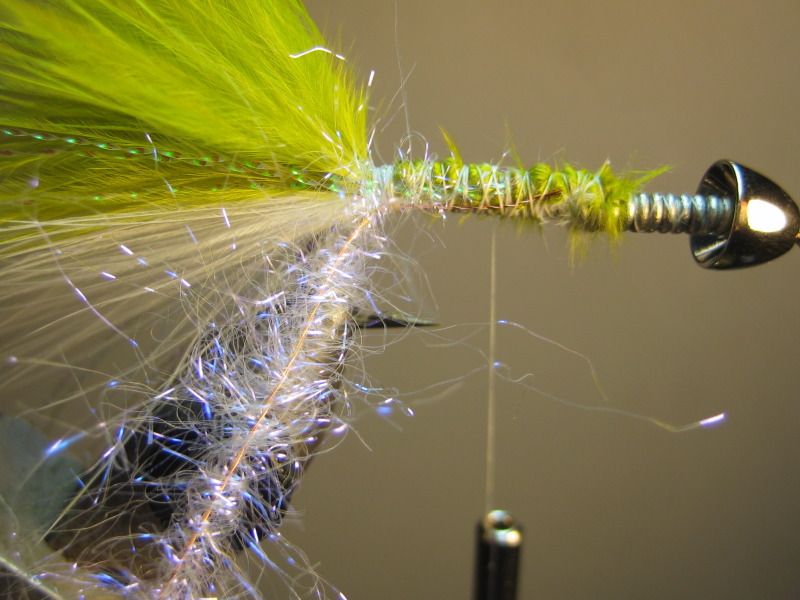
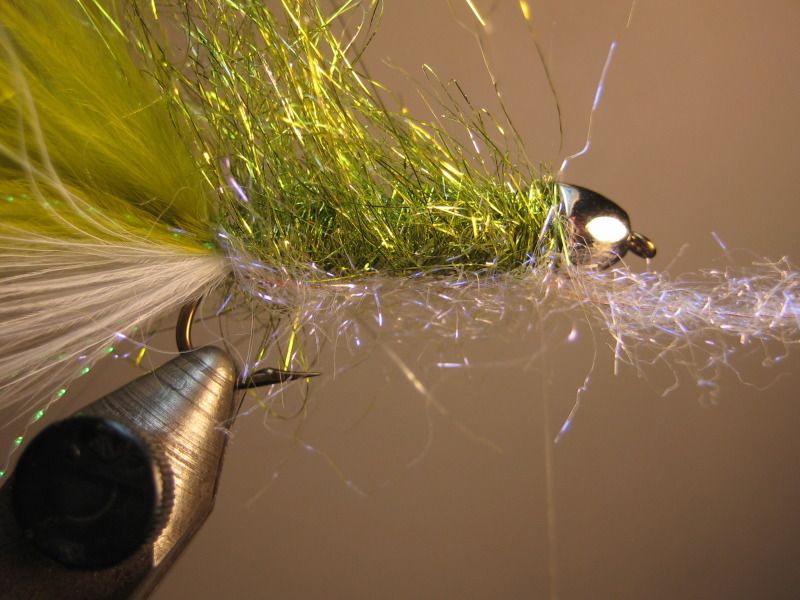
tie in pearl dubbing brush on underside of hook
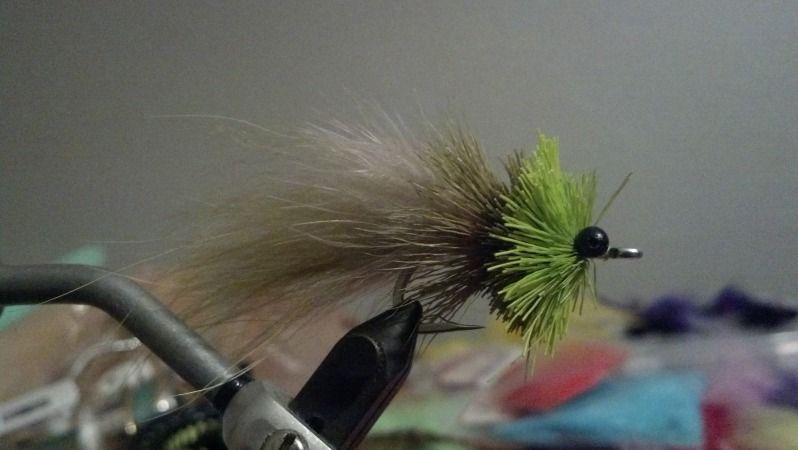
tie in chartreuse dubbing brush on top of hook
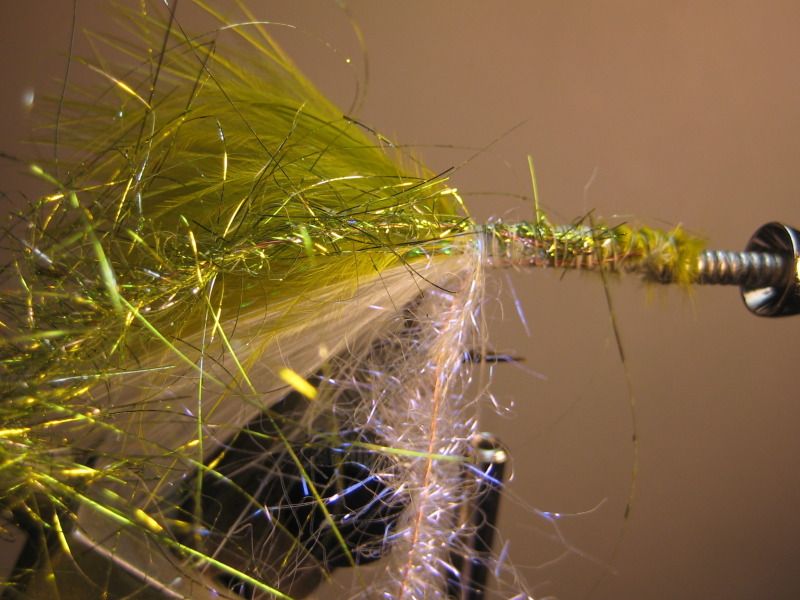
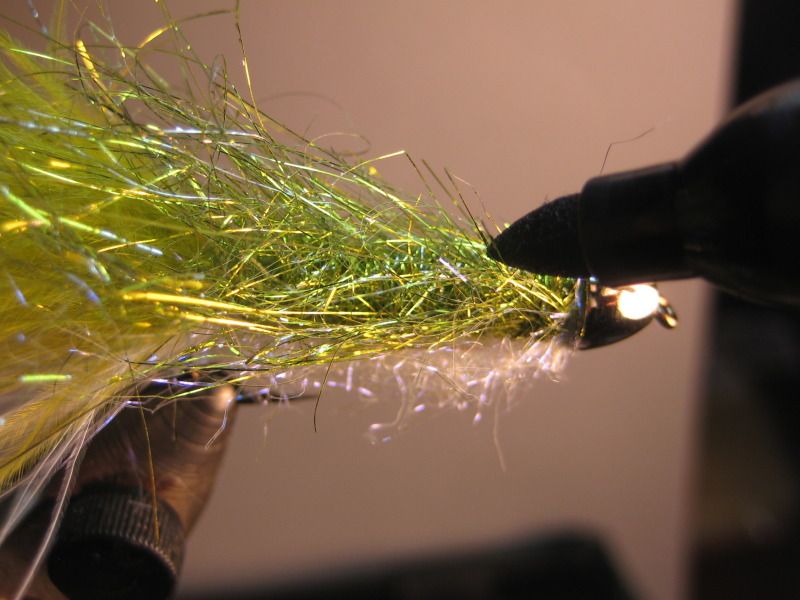
start chartreuse forward, sweeping fibers back
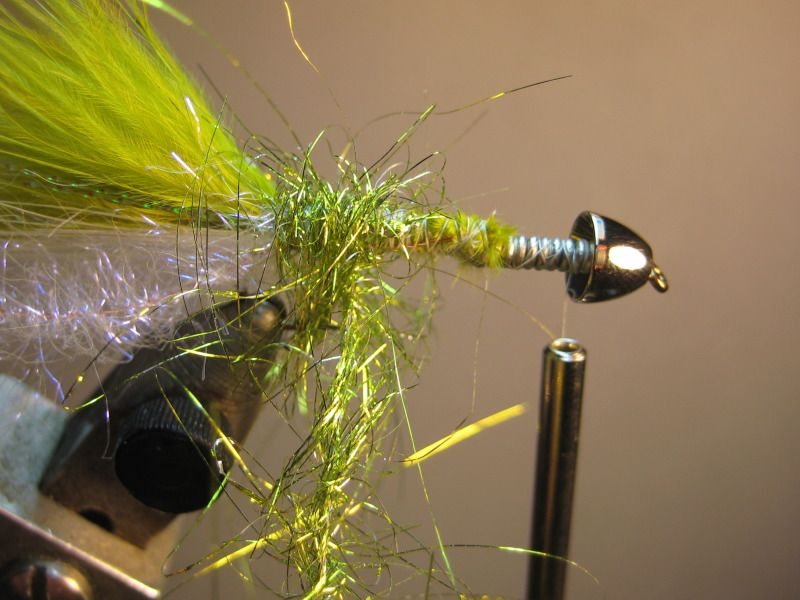
continue forward to cone and tie off; sweep fibers up and back
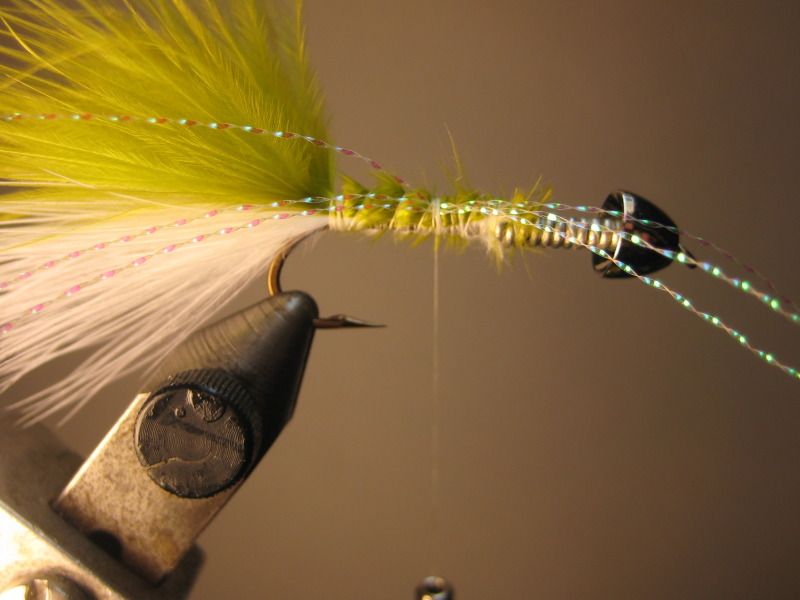
pull belly brush forward on underside of fly and tie down
take brush back along near side, go over the back of the hook bend and under the tail, then pull forward on far side and tie off (creates a fuller belly, maybe not necessary but I like how it looks); tie off.
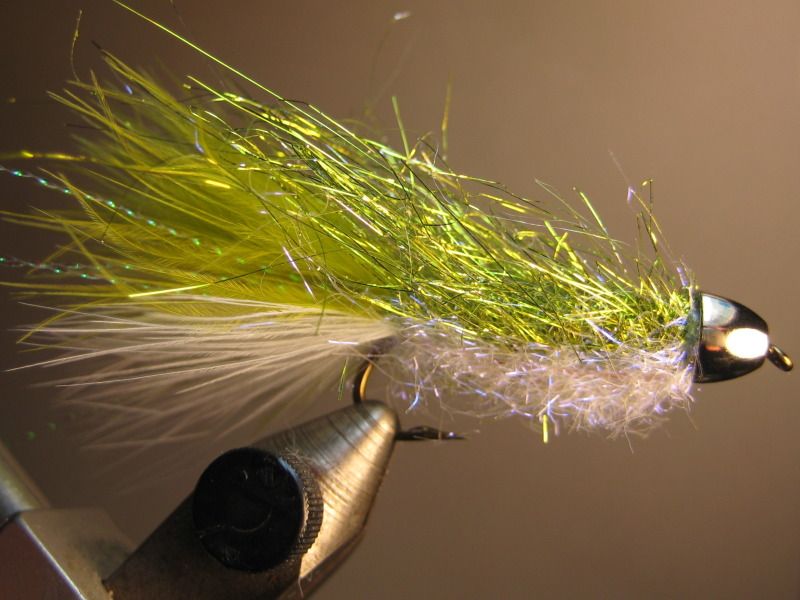
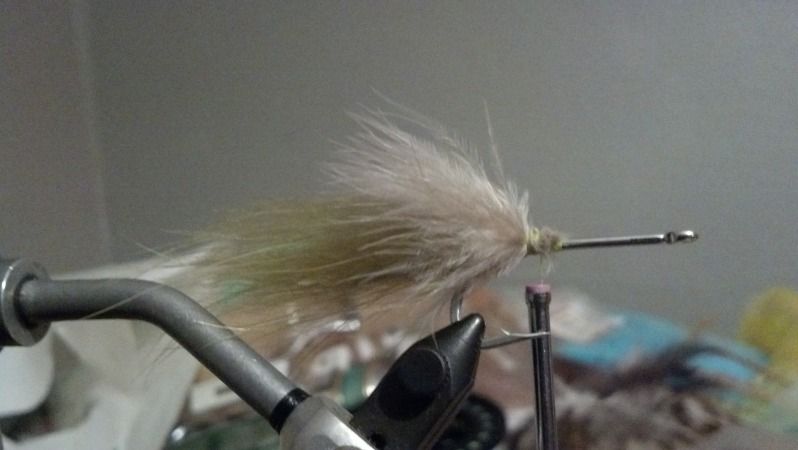
couple swipes on the back with a black Sharpie is optional
Change colors as you see fit (a baby brown trout would look neat).
I'm going to admit something on this post that I hope you quickly forget....I don't practice fly casting as much as I should. Whew!....that feels good to get that off my shoulders. Like many of you I have good days and I have bad days when it comes to casting - an occasional wind knot still plagues me.
Last year I attended a knot tying seminar hosted by local fishing legend Bob Nasby. Bob is one of those dudes with a funky mustach that has fished everywhere and caught everything. He can cast with his left hand better than I can with my right hand...one of those guys that has really got it down after 42 years of fly fishing.
Bob showed me a little trick that has helped my casting considerably. The concept is so simple it is almost too embarrassing to unveil. If you employ this tip you should notice a difference in your casting abilities.
Mark(er) the head
Bob Nasby showed me how to mark my fly line so I easily locate the fly line "head" while on the water. Knowing the location of the fly line head is the key to a good cast. Rather than reinvent the wheel I will post Bob's instruction directly from Rose Creek Angler'swebsite. Here you go!
Here's Bob with lesson #2 Lesson 2: The LOADING ZONE
The first thing we do in my casting class is to set the students up with a 6 wt. fly rod with WF-6-F line and a 7 ½ foot leader. We measure out the head length plus 5 feet and place a 10 inch long red mark on the fly line. If you remember from our last lesson the head length is the tip, front taper, belly, and rear taper. To locate the placement of the red mark, you need to find the end of the rear taper and measure out an additional 5 feet. (see fig.1) To find the end of the rear taper, locate the portion of fly line where the diameter is getting smaller as you go back from the tip. The end of the rear taper is the point where it stops getting smaller in diameter. This point should be quite noticeable without the use of a measuring device such as a micrometer, but if you have access to one, it may be helpful. With a permanent marking pen place a 10 inch long red mark 5 feet beyond the end of the rear taper.
Now you are set up for casting. With the line extended out of the fly rod and your line hand on this mark, you have the correct amount of line to properly “load” the rod. We place the mark 5 feet past the rear taper because with an 8 or 9 foot fly rod, 3-4 feet of the rear taper will remain in the fly rod guides. Some of the rear taper should stay in the fly rod to get the “head” to turn over. With almost all of the fly line head out of the fly rod, the rod will “light up”. If you try to learn to cast with a short length of line out of the rod, you will never feel the rod “load” and you will never learn to cast a fly rod. You have to feel the rod load and you soon will learn you can lay a fly out with only one false cast. Most fly fishers false cast way too much. All show and no go. They false cast because they can’t feel the load.
With the fly line lying straight out in front of you, with no slack in the line, and the rod tip to the ground/water you are now cleared for take off. Remember there are two parts to a cast. A back cast and a forward cast. When performing the back cast and the forward cast, I want you to think of the motion of starting a lawn mower. You start out slow and end up fast.
You start the back cast by raising the rod tip up and back. When you see the line leave the surface, stop your hand. Do not- do not bend your wrist at all. Just think of how your wrist is when you start that mower or when you throw a dart - you don’t bend your wrist then, don’t bend your wrist now. The only thing that should bend is your elbow. As soon as you stop your hand, count 1-2-3 and come forward with a smooth acceleration and then stop your hand. Do not bend your wrist when you stop. Wait until you see the line in flight and then turn the thumb down just a little (approx. 1”). This will push the rod tip down just a bit to allow the line to pass over it.
*Remember - accelerate just before the line leaves the ground/water on the back cast. Speed up, STOP your hand with your thumb just like your hitchhiking. Say 1-2-3, move your hand forward, accelerate - speed up - stop, count 1-2 then tip your thumb down approximately 1 inch and you just made a perfect cast (if you don’t bend your wrist). Remember - thumb on top of rod. Wherever your thumb points, that is where the tip goes and where the tip goes, that is where the line goes. If you snap the rod with a jerking motion, you kill the cast. Just stop your hand and do not bend the wrist. Bending the wrist is what all bad casters do. They think they have to snap the wrist. But, if you follow these instructions, you will soon make the perfect cast. The cast should feel just like fine silk. One last thing, trap the line under your index finger where the red mark is. You will know when you make that perfect cast, because the rod will want to jump out of your hand!
Here is a video of Bob at a local convention.
Don't want to mark it....just buy it!
Turns out that 3M has a line on the market that has taken the worry out of measuring and marking your own fly line (imagine that). Scientific Anglers HeadStart fly line marks the head portion of the fly line with a "bump" in the line that you can detect in your fingers while stripping. Strip in until you feel the bump, then use Bob's instruction above to load and cast the rod/line. Great stuff!
Scientific Anglers Mastery HeadStart Fly Line
The Scientific Anglers Mastery HeadStart Floating fly is costs $39.95.
First, this line is ½ size heavy for easier loading of your fly rod. Billed as a beginners fly line SA made modifications to other lines to produce an Easy-Fishing Taper. This taper really does help beginners learn to cast better.
The Scientific Angler HeadStart has the line slick additive called AST. A slick fly line casts farther and easier. The HeadStart line has all the pertinent information about the line printed on it, so at a glance you can tell which line you are fishing.
Features:
Half size heavy for easier loading
Forgiving taper optimized for most casting ranges
Telecast bump indicates best position to hold for casting
AST (Advanced Shooting Technology) - Scientific Anglers’ patented dry slick technology sets the standards for slickness. Advanced Shooting Technology (AST) Fly Line provides continual line slickness allowing the line to shoot farther as it moves virtually friction-free through the guides. AST fly lines easily shed dirt, algae and other parasitic drag particles allowing them to cast farther, float higher and stay cleaner than traditional lines.
SA ID - Scientific Anglers Line Identification is a result of their lab’s mission to continually improve their fly lines. SA ID is an innovative line marking system allowing you to identify your lines at a glance.
Streamlined Loops - Exceptionally slick and strong, welded Streamlined Loops produce smoother casts and easier turnover with a seamless fly-line-to-loop transition making for softer landings and cleaner pickups. The sleek design also maintains buoyancy for improved fly line floatation. Streamlined Loops also enable quicker connections between fly line and leaders.
I had a request to research and do a post about fly line care - another great topic for discussion! Good quality fly line has now climbed over $75 per spool, so you better make sure you are taking care of the stuff! If you keep your fly line clean and conditioned it will last for many years, but if you mistreat it you'll be dipping into the wallet again faster than you hoped.
Different brands....same steps
I combed the internet for fly line cleaning tips and found that the steps used to condition fly line were pretty much the same regardless of the manufacturer. The concept is pretty simple, wash the line in warm soapy water (many recommend old fashioned Ivory dish soap), give it a wipe down, use a fly line cleaning cloth for a deep cleaning, condition with a fly line conditioner then burnish again with the micro-abrasive cleaning cloth.
Rio Products has two videos that clearly shows the process and products needed to successfully rejuvenate your tired and dirty fly line. I like Rio's Wonder Cloth (and AgentX dressing) because the cloth is machine washable/reusable.
Stage 1 - Remove dirt and grime (after every few outings)
Stage 3 - Applying a new finish (after 8-10 outings)
De-plasticizing....say no to crack
Our fly vests often times hold chemicals that can really damage the coating on our fly lines. These chemicals de-plasticize fly line causing premature cracking. Here are a list of things to avoid when handling fly line.
Sun Screen
Insect Repellent with DEET
Aerosols
Another common mistake people make is to leave their line on the dashboard or in a blazing hot truck while they are in a cafe eating lunch. Do your best to keep your line in a cool, dark place. Excessive heat and UV rays will also cause premature cracking.
Heat (leave it out of the truck or on the dashboard)
Lastly, I want to address the use ArmorAll and other automotive cleaners. These products should NEVER be used on fly line. I was shocked to hear that ArmorAll actually causes cracking in fly line coatings. I cannot stress enough that you should only use fly line dressing to refinish the coatings on your fly lines. I have used ArmorAll and/or McGuires for years, but that is tabu! Mild soap, micro abrasion and fly line dressing only.
No more automotive cleaners!
Streeeetch! No way!
For years I have read articles about the benefits of stretching fly line to get rid of coils (line memory). There seems to be two crowds out there when it comes to stretching fly line. One group swears by the stretch, won't leave the house until the line has been tugged and yanked into submission. Others deal with the coil on the water by laying out line hoping the line lays flat EVENTUALLY.
Well.....I am in the stretch-free crowd, especially after doing this post. Many of the manufacturers urge people not to stretch fly line because it actually can reduce the lifespan! How can this happen you ask? Once fly line is stretched and reeled back up on the spool the coating on the line wants to return to it's normal state. The line will constrict, forming an extra tight coil on the reel. Next time you go out the coil could actually be worse. All of this stretching stresses the fly line coating!
Here is what Airflo has to say about stretching fly line:
"There are a lot of people who think that stretching the line at home will help - this is a popular misconception and this will actually make the line worse as it will contract whilst on the reel and create even worse memory!!"
Instead of stretching, clean and condition your lines. Often times a good cleaning will keep your line supple and free of coils.
Don't forget the backing!
I'm not sure about you, but I rarely think about the backing on my reels. The truth is the stuff rots pretty easily especially if it is packed away when it is wet. Here is a story I found online that shows how important it is to check your backing every once in a while....
"As I was stripping in the ol' bobber for another grandiose lob cast (and thus making small popper-esque splashes) I saw a v-wake form behind my trailing flies and a fish made a great splashing lunge at the surface. Being rather dumbfounded I did the right thing-- nothing. The fish grabbed turned and then hooked itself firmly in the jaw as it made a blistering run that ran me all the way to my backing. Then as I watched my whirring reel change colors from fly-line green to backing orange the rod bucked and I heard a strange tearing/popping sound.
The entire fly line, brand new fluorocarbon leader, and two fresh flies-- gone. I'm truly embarrassed to even be telling this story. Shocked, I watched for a few seconds as the fish jumped several times, fighting the resistance of the 100ft of line trailing behind it. I felt sick. Not sick that I had lost a few dollars in equipment, but sick that I had just left a tangled pile of brightly colored, non-biodegradable, plastic crap at the bottom of the river with a fish attached. I searched in vain hoping to find the line, hoping to free the fish, hoping to correct the mistake I just made--"
Bummer huh? I have never had this happen to me personally, but you'd be surprised how often it happens (look online and you'll find many horror stories). Keep an eye on the condition of your backing and the knot used to join your fly line. You'll be glad you did!
Take Care
I hope these steps keep your fly line investment floating high and coil free. Use products and materials made for specifically for fly line and follow the steps outlined in the RIO videos and you'll be in great shape.
Next we will be looking into fly rod and reel care...winter is long, so we might as well get our gear ready for spring!
Here is another very nice fly I found online. I did not do the tying or the tutorial... Great looking pattern, I especially like the egg sack. This one can easily be altered a bit for smallies.